Recipe
For the tart shell
1 2/3 cup flour
3/4 cup butter (that's 1 1/2 sticks, and should be very cold)
1/2 teaspoon salt
5 tablespoons ice water
tart pan with removable bottom (mine is ~12")
For the filling
3 large onions
12 strips of bacon
4 large eggs
1 cup half and half
1/2 teaspoon grated nutmeg
salt and pepper to taste
To be honest, aside from bragging rights, there's not much to gain by making the pastry dough from scratch. I've experienced a few baking disasters when it comes to making biscuits and pie dough, so this was more of a facing-my-demons type of challenge than making a superior tart. These days, all supermarkets carry frozen puff pastry and the quality are quite good. If you to decide to take a short cut and use pre-made dough, go ahead! I wont' judge, I promise :).
Now, for the sticklers out there, away we go on our pastry adventure! First things first, the butter needs to be cold -- North-Pole-frozen-solid cold, breaking-up-with-your-significant-other-over-text cold. Well, you get the idea... In my previous baking recipes, I always call for room temperature butter, but in this case, no planning ahead is needed! Just take the butter out of the fridge right before you start on the dough. For the ice water, I put a small bowl of water in the freezer when I start on the tart shell and take it out when I'm ready to use it. The reason why everything needs to be cold is because cold butter stays solid when the flour coats it. When baking in the oven, these little butter "cells" melt, thereby creating a flakey, airy crust. Cut the butter into small cubes, around 1/2 inches.
 |
| Mmmm... delicious butter |
Fit the food processor with the dough blade. In case you're wondering, that's the other blade that came with your food processor (and probably never used before) that has stubby, not very sharp blades. Toss in the butter and then sift in the flour and salt. You don't technically need to sift the flour, but I wanted to do everything I could to ensure the dough is light. Pulse the butter and flour mixture until you get a rough, mealy texture. There will be some bigger pieces of butter in there, that's OK. The blend doesn't have to be uniform. If you don't have a food processor, cut the butter and flour in a large bowl with a fork or pastry blender.
 |
| It's fine to leave some bigger pieces of butter in there |
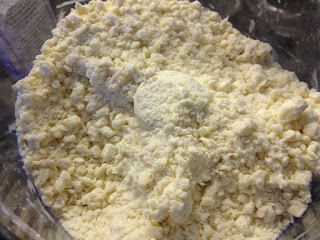
Once the butter and flour are blended, drizzle the ice water evenly over the mixture. Pulse until just combined. Use a fork to mix the water with the butter and flour if you don't have a food processor. Grab a handful of the dough to see if the dough is sticky enough to form a ball. If not, add more cold water, half a tablespoon at a time. Be careful not to over mix as that will make the dough tough. My dough was super crumbly even though I added around 6 to 7 tablespoons of water. The recipe originally called for 2 cups of flour, I believe cutting the flour by 1/3 of a cup should make the dough more manageable.
 |
| The dough will be very crumbly |
Empty the mixture onto a clean surface. I used a large baking tray to minimize cleanup and it worked pretty well. Carefully, work the mixture into a ball by pressing the crumbly mixture together with your hands. Try not to handle the dough too much if possible because that will make it dense. I had a lot of trouble getting the dough to behave and lumping together (probably because I used too much flour). Be patient and gentle. If it really refuses to clump, add a bit more water. I actually figured out a nifty way to do this by lining the baking tray with a large piece of plastic wrap. I gather the plastic sheet into a satchel, push down on the dough to form a ball that way. Not sure if that's cheating or not, but hey, it works! Put the bundle of joy in the fridge for an hour to cool.
|
|
|
|
|
|
 |
| Smells like heaven |
While the onion and bacon mixture cools, in a large bowl, combine the half and half, nutmeg and eggs. Whisk until incorporated and add in the cooled onions and bacon. Make sure the onions and bacon are completely cooled so you don't cook the eggs when mixing with the half and half blend. Season with salt and pepper. Spoon the mixture into the tart shell all the way to the rim. Using a fork, spread out the onions to make sure the custard is even. If there is any filling left over, reserve for a frittata later. Bake in a 400º oven for 30-35 minutes, until the top is golden and the custard is set. Let cool before cutting and serve at room temperature.
|
|
I brought this savory tart to a holiday party and it was very popular. The crust probably still needed a bit more work. It was more crispy than flakey in some spots, but hey, a little texture never hurts anyone. I'll have to look around for other dough recipes to see if I can find one that works for me. I think many people use shortening in additional to butter in the dough, I should experiment with that. I've been wanting to get a tart pan for a while and I want to thank my bestie Nahal for the William Sonoma gift card!! Lots more tart-y adventures from here :).


No comments:
Post a Comment